Strange audio experiment
Wednesday, April 19, 2006
Don’t ever be afraid to try something completely off-the-wall. Today, I will share a few of the crazy tricks I have tried with audio files.
Raw audio data isn’t really any different from raw image data. What is considered ‘raw”, you ask?
Most high-end audio and graphics software allow you to save a newly created file as in a raw format. Raw audio is simply the storage of the recorded audio waveform at whatever sample rate you used. Normally, this would be a line-in or a microphone recording, as a .wav file. Uncompressed .wav files are basically raw audio data with a small header tacked on to them.
For graphics, a .bmp file is essentially an uncompressed image file, with a small header tacked on to it. .bmp files and .wav files are sort of like image and audio counterparts.
When working with raw information, however, you do not want this header information saved. Make sure to keep notes of sample rates, bit depth, and other details, since they won’t be saved in the files.
Record some music, or your voice into Sound Forge, or another similar audio program, and save as a .raw format. There should be options, such as bit depth, sample rate, etc. It’s important to save as “unsigned”, though. Make sure to take notes of all the technical attributes, and then save the file in the raw format. Make sure to save it as 8-bit and not 16-bit.
Open the .raw file as a raw image file in a graphics editor (Adobe Photoshop works well for this). You will need to determine the size of the image. Do this by finding the square root of the total size of the .raw file. If you record a raw audio file that is 162,000 kilobytes, then your image is going to be 402px x 402px square, with some data at the end obviously being omitted. You can re-work the dimensions so that more of the data is included, but in most cases it doesn’t matter if you shave a bit of the audio off at the end in order to get a rectangular image. Audio data uses one dimension and image use two, so this is why it works that way.
It’s also important to open the image as an 8-bit greyscale image. One pixel should be 8 bits, so that each byte corresponds to one pixel.

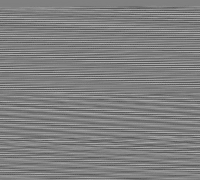
The image that you see should be a grey image with wavy lines flowing through it. The lines change color according to the amplitude and frequency of the audio they represent. Each pixel corresponds to a sample in the audio. One second of 44.1 kHz audio, mono, and 8-bits per sample should equal 44,100 bytes. As an image, this would equal 44,100 pixels, 8-bit greyscale. Such an image’s coordinates would be 210 pixels square. Come to think of it, it’s interesting how that comes out even.
If you print this greyscale image out on paper, provided your printer is of a reasonably high quality, you will effectively be storing actual audio data on paper.
Store the paper somewhere for however long you wish; it should be somewhere where light cannot fade the ink. If you were to scan the paper years later, using a high-quality scanner and Photoshop (or another high-quality graphics program), after straightening the image and adjusting the contrast, you’d have a raw audio file that could be played back.
A word of caution, however: The quality of “scanned” audio is going to be a bit worse than an old vinyl record. The printer will introduce noise into the recording on paper, and flaws in the conversion process (scanning, straightening, and the inherent blur between individual pixel rows in the scanned image) will further distort the audio. The worst distortion comes from vertical bleed and blurring, because each line of the original data was completely separate from the next. The effect sounds something like a very bad echo.
This process is by no means a viable way of storing audio data. It is, however, a creative experiment that does yield a somewhat functional result.
Progress
2214 Extras: Page 6
100%
Search the site
January '25 Updates
| S | M | T | W | T | F | S |
|---|---|---|---|---|---|---|
| 1 | 2 | 3 | 4 | |||
| 5 | 6 | 7 | 8 | 9 | 10 | 11 |
| 12 | 13 | 14 | 15 | 16 | 17 | 18 |
| 19 | 20 | 21 | 22 | 23 | 24 | 25 |
| 26 | 27 | 28 | 29 | 30 | 31 |
Ideas
